Hardware Setup:
This is a robotic vehicle
controlled by 68HC11 micro controller activity board. It has a 32KB memory, 21
analog input channels, 9 digital input channels, 9 digital output channels, it
drives 4 DC motors and 6 RC servo motors. It has a 16X2 LCD display and a
buzzer for producing beep. The program is downloaded to the board through a
RJ11 cable.

Sensors used:
There are different sensors used
in this vehicle.
Sharp
proximity sensor: As the name suggest it is a sensor which is used to
inform the micro controller when an object comes close proximity to it. It is
an IR transceiver sensor which operates in 5V DC. And it gives analog voltage
corresponding to the distance of the object from it. It gives low voltage when
the object is far away compare to a closer object. It should be connected any
one of the analog input channels of the board.

Touch
switch sensor: it is a digital sensor which informs the controller when
the front side of the robot bumped to some other object. Actually it is a
push-to-ON (push button) switch which is used as a sensor. When the vehicle
collides with an object the switch is pressed and it sends a high digital pulse
to the controller. It should be connected to the digital input channel of the
board.

IR
reflector: there are three IR reflector sensors placed at the bottom of
the chassis. They are used for the track detection purpose. These are analog sensors so they should be
connected to the analog channels of the board.

Software:
The programming IDE is called
Interactive C (IC). It is similar to C with some more inbuilt function. The
syntax is also same as C and it support all C data types. Some of the hardware
interactive library functions and their syntax is listed below:
motor (motor #, speed):
this function is used to rotate the motor. Here the motor no. varies
between 0-3 and the speed varies between 0-100.
sleep(float x): Gives a
delay to the program. And x is in second.
Start_button(): Returns 1
when start button is pressed.
digital(port#): Returns 1
if the port is connected to 5v and returns 0 when the port is connected to 0V. the
return type is integer
analog(port #): Returns
the value between 0-255 corresponding to analog voltage 0-5V. the return type
is integer.
beep(): Causes a beep
sound.
off(motor #): Turns off
the motor specified.
ao(): urns all motor
ports off.
Connection Procedure:
Double click on the Interactive C
shortcut on the desktop. Then the following window will come

Click on AX-11 board type

Select the com port, and click on
connect now.

Then click on "Download firmware."

Again
select the com port and click on "Download firmware".

Connect the RJ11 connector
between computer serial port and the vehicle board. And then click on "Next".

Look at the SER LED, if it is
blinking click on "Yes, it’s blinking". If not click on "Not blinking".

Turn OFF the power switch on the
board and click on "Next".

Pick up the robot in hand because
at this stage the motor will start rotating. Then first hold down the stop
button and then turn ON the power and click on "Next".
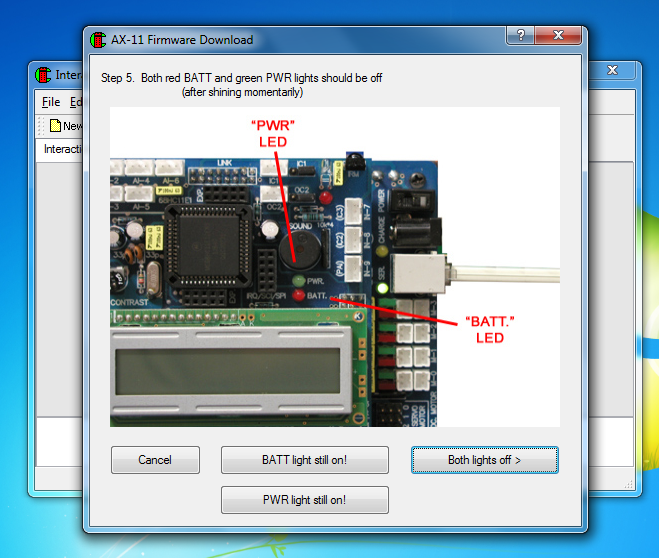
Look at the PWR LED and Batt LED
if both are then click on "Both lights off" otherwise click on the tab as
per the light conditions.

Now the firmware starts
downloading to the board. Firmware contains necessary library files for the
controller.

This is the interactive window
for testing the connection. You write the command at the white bottom area it
will reflect over the grey area, if the code is correct it will return zero otherwise
a wrong message.

For the code printf(“hello
world”) it executes successfully and returned 0, and for the command hello it
returned an error message undeclared symbol hello.

Then go to file and click on new.
A new tab will open where you can write the program and download it to
controller.
Write the program, save it and
download it to the micro controller. Here is some sample programs
Sample program:
Code for forward movement of
vehicle:
#define speed 50
void main()
{
ao();
printf("press start\n");
start_press();
while(!stop_button())
{
motor(0,speed);
motor(1,speed);
//sleep(2.0);
}
}
Code for backward movement:
#define speed 50
void main()
{
ao();
printf("press start\n");
start_press();
while(!stop_button())
{
motor(0,-speed);
motor(1,-speed);
//sleep(2.0);
}
}
Code to read sharp sensor value:
void main()
{
while(1)
{
int value;
Value=analog(22);
printf("value=%d\n",value);
sleep(1.0);
}
}
Code to read track IR reflector
sensor value:
void main()
{
while(1)
{
printf("L=%d M=%d
R=%d\n",analog(29),analog(25),analog(19));
sleep(2.0);
}
}
Code to test touch switch sensor:
void main()
{
while(1)
{
printf("L=%d R=%d\n",digital(15),digital(10));
sleep(2.0);
}
}
Task to Solve:
Task to Solve:
- write a program to drive the vehicle so that its path would draw a SQUARE
- write a program to drive the vehicle in its own path avoiding the collision with other objects.
- write a program to drive the vehicle to follow the white line
No comments:
Post a Comment