Objective:
- Connect Arduino with LabVIEW
- Perform basic programming like Analog input output and digital input output with Arduino and LabVIEW
- Interface some digital and Analog sensors using Arduino and LabVIEW.
Apparatus and tools
required:
- PC with latest version LabVIEW and Arduino preinstalled.
- Arduino UNO R3
- Tacktile switch, potentiometer, LED, resistors and some jumper cable
- DHT22 humidity and temperature sensor.
- SR-04 ultrasonic distance sensor.
Theory:
We need to connect LabVIEW with Arduino
in order to get a beautiful front panel.
Arduino can be interfaced with LabVIEW
using two different ways.
- Using VISA communication.
- Using VIPM(VI package manager)
Procedure 1:
In this method, Arduino is
separately programmed by the Arduino software first. So you should have basic Arduino
programming knowledge. Then the Arduino is linked with LabVIEW by serial
communication through COM port. The Arduino should be programmed to send the
data through serial port to LabVIEW using "Serial.println()" function . The LabVIEW is programmed to receive the
data in the form of string sent by the Arduino, convert the data to proper data
format and process them as per the requirement.
In
this method the Arduino works as a standalone device irrespective of LabVIEW. LabVIEW
is not used to program the Arduino, rather it is used to process the data sent
by the Arduino and display them in the front panel.
Steps:
- Connect the Arduino UNO R3 board to the pc and open the Arduino software.
- Write the code and upload it to the board.
- Whatever data you want to process or display in the LabVIEW front panel, you have to send it using “Serial.println() command” in the Arduino. Make sure the baud rate is set to 9600.
- Then open the LabVIEW, open a new VI. Right click in the block diagram and navigate to Instrument I/O function palate.
- Find the “Serial” sub-palate where you can get all the necessary tools to receive serial data sent by the Arduino.
- Here “String” function palate is going to be used mostly. You should have a good command over that.
Download the example codes from the link given
below:
- Arduino code to send data to LabVIEW. Blink example.
- VI to receive data from Arduino. Read example.
- Arduino code to receive LabVIEW data.
- VI to send data to Arduino.
Procedure 2:
In this method the Arduino is
programed by the LabVIEW itself. So the Arduino doesn’t play as a standalone
device. As long as the LabVIEW is active Arduino is active. Since Arduino is a
third party hardware LabVIEW doesn’t have its tool box pre-installed. You have
to install it manually by using VIPM. The detail procedure is explained below:
Steps:
- In the start menu of Windows search for “VIPM” and click on it.

- If the latest version of VIPM is installed it will open otherwise it will ask for update. Click on update and follow the process to install with administration permission.
- After successful installation of latest version of VIPM open it and search for “LINX” in the search tab.
- Select it by a single click and click on “Install” button, and follow the onscreen procedure to install it with proper administration permission. If there is “Uninstall” button active, which means the package is already installed.

- Now you can find the LINX toolbox under MakerHub in the block diagram function palate.

Now come to the programming part.
Before programming the Arduino needs to be configured by downloading the
firmware from the LabVIEW. The steps are explained below:
Steps:
- Click on LabVIEW software and open new VI.
- Connect the Arduino to the pc. Openthe device manager and note down the com port number where Arduino is connected.

- Go to the tools menu-->MakersHub-->LINX-->LINX Firmware wizard

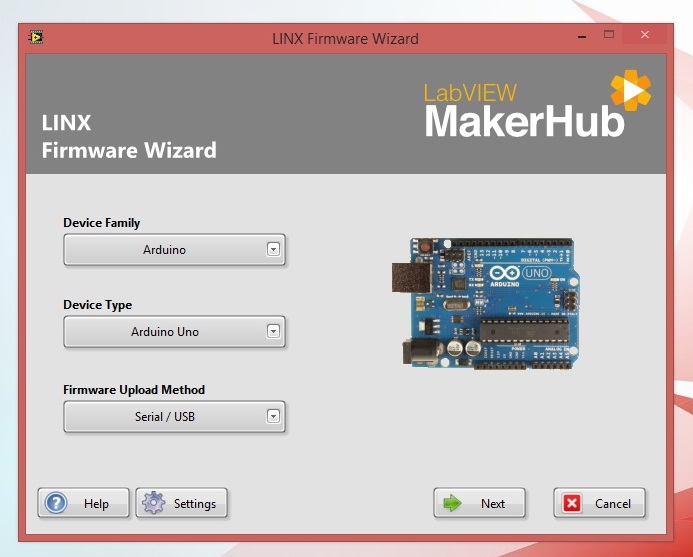
- In the LINX firmware wizard select device family as Arduino, Device type as Arduino UNO and firmware upload method as Serial/USB. Then click on Next.
- Select com port# and click on next.

- Then select firmware version as LINX-Serial/USB and Upload type as Pre-Built firmware. Click on Next

- The firmware will start uploading to the Arduino. After uploading is finished click on Finish.


- Now you can program the Arduino using LabVIEW toolbox.
 |
| Drag and Drop this image on the Block Diagram it will form a VI |
This example code makes the LED, connected to D13 of Arduino board, to glow as per the switch condition in the Front panel. Eventually you can control the LED from the VI front panel.
** Select proper COM Port from the front panel
No comments:
Post a Comment